New Sales & Billing Telephone Hours

June 2, 2010 at 5:43 PM

We now offer sales and billing assistance via our toll-free number (1-888-865-6515). Looking for some great website hosting? Have a question about your account? Give us a shout!

Sales and Billing telephone hours are every Monday thru Friday, from 8 AM to 5 PM, Central Standard Time.

Have a question after hours?

Geek Support is available, 24 hours a day, 7 days a week, via our e-mail based ticketing system. Send an e-mail to [email protected] and we'll get you taken care of. :)

Setting Up Redmine & Ruby on Rails with LiteSpeed at GeekStorage

May 9, 2010 at 4:07 PM

We love LiteSpeed here at GeekStorage, and we would like to show how LiteSpeed Ruby on Rails applications can be setup quickly and easily. This guide will take you through the steps of setting up a new Ruby on Rails application (in this case the Redmine application) on the GeekStorage shared or reseller hosting service.

What You Will Need:

  • A GeekStorage shared or reseller hosting account with SSH access.
  • The latest stable version of Redmine (available here).
  • At least one available MySQL database and Subdomain.

Getting Started:

The first step to getting the new Redmine application online is to get a Ruby on Rails environment ready. The best way to do this, is to first determine where we would like the Redmine application to be hosted, in this tutorial we will be using "redmine.ourdomain.com" but this can be any subdomain, addon domain, or even your primary domain. To get started we have created our new subdomain in cPanel:

Within the account cPanel control panel, select the "Subdomains" section, and create a new subdomain for Redmine installation.

Configuring Subdomain

Next, we need to create a MySQL database and user for the Redmine application. For this we will simply use the MySQL Database Wizard in cPanel.

Make sure to remember the database name, username, and password for use later when configuring Redmine.

MySQL Database

After the database name is provided we need to supply a username for use with the database.
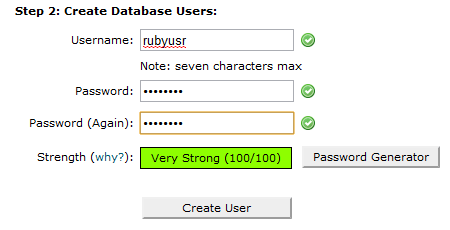
MySQL User

And next we need to make sure the new user has full privileges to the database.
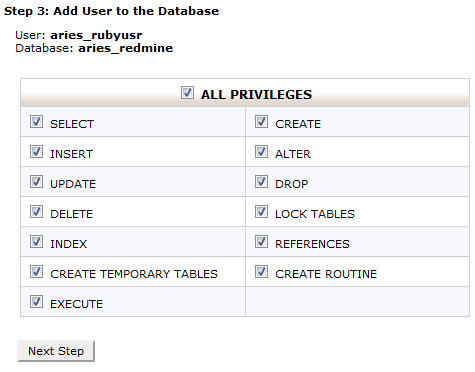
MySQL Privileges

Rails Application Setup:

Now we need to create our rails application directory, we recommend using a directory outside of your public_html folder for added security. In this case we will be using a directory in our home directory called "rubyapps" - we create it like so via our SSH account:

$ mkdir ~/rubyapps

Next, we will go ahead and download the Redmine software and get it placed under the ~/rubyapps/redmine directory:

$ wget http://rubyforge.org/frs/download.php/70486/redmine-0.9.4.tar.gz
$ tar zxf redmine-0.9.4.tar.gz
$ mv redmine-0.9.4 ~/rubyapps/redmine

Now we need to enter our MySQL connection details in to our Redmine configuration file. For most Ruby applications, this file is typically located at "config/database.yml" relative to the application folder. In this case, the file is named "database.yml.example", so we need to make sure it is renamed accordingly before we proceed. Via SSH, we move the file and open it to make our adjustments like so:

$ cd ~/rubyapps/redmine/config/
$ mv database.yml.example database.yml
$ nano database.yml

In this file we are going to see a number of entries, for this tutorial we will only be using the entries directly below the "production:" line. We now edit these lines to match MySQL details entered previously, in this case it looks like so:

production:
  adapter: mysql
  database: aries_redmine
  host: localhost
  username: aries_rubyusr
  password: ourpassword
  encoding: utf8

Now we need to generate a session store secret, this is used by Ruby to manage cookies for the application. This can be done via shell:

$ cd ~/rubyapps/redmine/
$ rake generate_session_store

The database must also be configured via shell, note the last command will ask the language to be configured with the Redmine installation, there are many languages available, in this case we have chosen "en" for English.

$ cd ~/rubyapps/redmine/
$ RAILS_ENV=production rake db:migrate
$ RAILS_ENV=production rake redmine:load_default_data

LiteSpeed Configuration:

Next, we are going to setup LiteSpeed to recognize the Redmine folder as a Ruby application folder. With LiteSpeed, this is a bit different than the usual Ruby on Rails configuration. For LiteSpeed to recognize there is a Ruby on Rails application on your account, we need to create a new file called ".ls_rails_config" in our home directory.

$ nano ~/.ls_rails_config

This file is going to tell LiteSpeed details about our Rails application, for now we will populate it like so:

#RailsApp <name> <App Path> <Rails Env> <Children Processes> <RunOnStart>
RailsApp redmine "/rubyapps/redmine" "production" 4 1

#RailsAppMap <name> <domain> <URI>
RailsAppMap redmine "redmine.ourdomain.com" "/"
RailsAppMap redmine "www.redmine.ourdomain.com" "/"

Now we are able to access Redmine at redmine.ourdomain.com! If you are following along, click the "Sign In" button in the top right corner, and use username "admin" password "admin" to login, and make sure to change your password to something more secure as soon as possible.

Reconfiguring The Application:

If any configuration changes need to be made, for example modifying the email.yml file to add email capabilities to the Redmine application, first make the desired adjustments, then run the following command via SSH to restart your Ruby application:

$ touch ~/.ls_rails_config

Notes For Other Rails Applications:

This tutorial shows a typical Redmine installation under the Ruby on Rails LiteSpeed configuration with our hosting services. If you want to install an application other than Redmine, the steps are exactly the same, just make sure to follow along your application installation guide after creating the database & subdomain, and use the ".ls_rails_config" file instead of any mongrel-rails or WEBrick configuration. Also note, it is also typically unnecessary to adjust folder write permissions with our hosting services, as the Ruby application will run under the account username, the application will have write access to necessary folders even at the default CHMOD 755 setting.

Limited Time Promotion: 50% Off, 50% More, Free RAM Upgrade (Managed VPS)

May 3, 2010 at 9:09 PM

Link: http://www.geekstorage.com/gs/service/vps/specials

For a limited time you can take advantage of the following offer on all of our Managed VPS plans. Special offers cannot be combined and do expire, so we urge you to go geek now and save big while you can!

Special (#1) - 50% OFF (one-time), FREE RAM Upgrade & 50% MORE space & bandwidth! (LIMITED SUPPLY) - COUPON: 50off50more

Visit our Managed VPS website, located at http://www.geekstorage.com/gs/service/vps, for complete details and to place your order today!

State of GeekStorage - April 2010

April 19, 2010 at 4:56 AM

Greetings Geeks!

It's been quite awhile since our last "State of GeekStorage" and I wanted to take the time to put into writing some of the amazing ideas and enhancements we have in the pipeline for our geeks.

We're healthy!

GeekStorage.com has continued to remain a private and profitable corporation, with no debt. Our sales over the last year have steadily increased, albeit a little slower due to the current economy, and we look forward to another great year of building and maintaining our awesome internet playground.

Ksplice and Softaculous - Two New Features

We have recently installed Ksplice on all of our shared, reseller and VPS servers. This is a great server administration utility that allows us to update our servers without rebooting, saving your website from further downtime.

We will soon be offering Ksplice on our managed dedicated server offerings as well.

We have recently started adding Softaculous to new shared and reseller servers. Softaculous is a script auto-installer, much like Fantastico, that offers you the ability to demo, rate, and one-click install over 130 scripts!

Click here for a complete list of scripts installed by Softaculous

Every shared and reseller server will soon be installed with Softaculous. Softaculous is also available on our VPS and managed dedicated servers, absolutely free of charge.

Additional Network Capacity - Chicago, IL Data Center

Level3 nLayerNTT PCCW

We have added additional network capacity with our Chicago, IL Data Center and are currently in the process of shipping new hardware there now. Over the last couple of months we didn't have a lot of availability for new shared, reseller, VPS and dedicated customers wanting to be with us in Chicago, IL. This additional capacity has fixed that problem.

"Cloud Hosting" - Powered by Citrix XenServer

Citrix XenServer

Over the last several months we have been researching and planning an enhancement to our existing hardware and networking infrastructure to support what is commonly referred to as "cloud hosting" (see the Wikipedia "cloud hosting" article for more details). Whereas there is still a lot of debate as to what "cloud hosting" really is -- our implementation of the technology will not be as confusing or "clouded" (excuse the pun!).

We have invested tens of thousands of dollars adding and upgrading our hardware and network to support this new platform. Our implementation will eliminate single points of failure, add scalability, enhance reliability and so much more -- the best part is: we'll keep it affordable. We've always tried to build the best internet playground for the most affordable pricing. I can tell you this, we will  bring you an affordable cloud hosting platform that only large corporations have been able to take advantage of for years.

We do plan on migrating our existing shared and reseller customers to this platform. High-availability hosting (running two "instances" of your website on two separate servers) is on the table and will be an offering, just not initially.

We will have more information on this exciting subject soon!

Coming Soon! New Geekmunity Portal

We have been hard at work on a new customer front-end over the last couple of months. We do not have a date, set in stone, that we will launch our new portal, however, it will be soon(TM). The new portal will be powered, on the backend, by Ubersmith.

This new portal is amazing and will offer you the ability to easily manage your online account(s) with us.

Some of the key features include:

  • Account Details Management (your details, add additional users, etc.)
  • Billing Management (credit cards, PayPal, invoice history, account credits, etc.)
  • Service Management (a listing of your services, ability to upgrade/downgrade, cancel, order additional services, etc.)
  • Device Monitoring (allows you to setup a device monitor for your VPS or dedicated server)
  • Domain Management (fully integrated into the portal)
  • Support Resources (knowledgebase, online videos, support tickets, etc.)
  • Reseller Portal (a special portal for our resellers)

A quick sneak peek:

PNG image

PNG image

In Conclusion

I just want to thank you for being a geek, or at least thinking about becoming a geek, and hope that you are ready for some of the amazing additions and enhancements we have in the works!

Have any comments or suggestions? Please feel free to let us know!

Regards,

Jay & Matt, Head Geeks

P.S. Don't forget, we're on Twitter! @GeekStorage

Welcome to our new blog!

April 19, 2010 at 12:29 AM

Welcome to our new blog! As I'm sure our geeks our well aware, we take customer feedback extremely seriously. We welcome your comments and suggestions on our blog posts -- your feedback is truly appreciated.

We will be closing the Geekmunity Forums soon, as we focus more on interacting with you through our blog and Geekmunity Portal (coming soon!). We may bring back forum functionality within this new portal at a later date.

We will no longer be posting service, server & network announcements on the Geekmunity Forums, they will instead be posted here.

I recommend bookmarking this blog, as we have some very exciting posts to come (hint: cloud hosting, network upgrades, Geekmunity Portal, and so much more!).

Stay tuned!