Setting Up Redmine & Ruby on Rails with LiteSpeed at GeekStorage
We love LiteSpeed here at GeekStorage, and we would like to show how LiteSpeed Ruby on Rails applications can be setup quickly and easily. This guide will take you through the steps of setting up a new Ruby on Rails application (in this case the Redmine application) on the GeekStorage shared or reseller hosting service.
What You Will Need:
- A GeekStorage shared or reseller hosting account with SSH access.
- The latest stable version of Redmine (available here).
- At least one available MySQL database and Subdomain.
Getting Started:
The first step to getting the new Redmine application online is to get a Ruby on Rails environment ready. The best way to do this, is to first determine where we would like the Redmine application to be hosted, in this tutorial we will be using "redmine.ourdomain.com" but this can be any subdomain, addon domain, or even your primary domain. To get started we have created our new subdomain in cPanel:
Within the account cPanel control panel, select the "Subdomains" section, and create a new subdomain for Redmine installation.

Next, we need to create a MySQL database and user for the Redmine application. For this we will simply use the MySQL Database Wizard in cPanel.
Make sure to remember the database name, username, and password for use later when configuring Redmine.

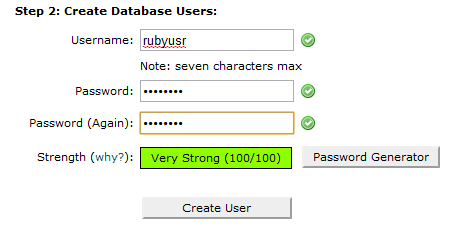
After the database name is provided we need to supply a username for use with the database.

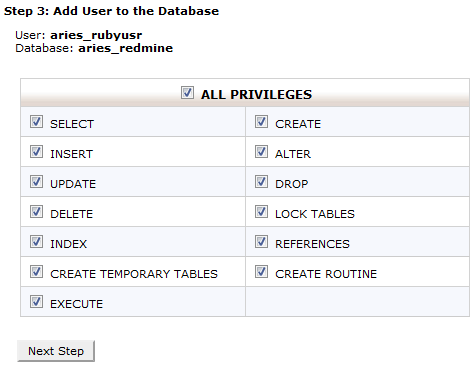
And next we need to make sure the new user has full privileges to the database.

Rails Application Setup:
Now we need to create our rails application directory, we recommend using a directory outside of your public_html folder for added security. In this case we will be using a directory in our home directory called "rubyapps" - we create it like so via our SSH account:
$ mkdir ~/rubyapps
Next, we will go ahead and download the Redmine software and get it placed under the ~/rubyapps/redmine directory:
$ wget http://rubyforge.org/frs/download.php/70486/redmine-0.9.4.tar.gz
$ tar zxf redmine-0.9.4.tar.gz
$ mv redmine-0.9.4 ~/rubyapps/redmine
Now we need to enter our MySQL connection details in to our Redmine configuration file. For most Ruby applications, this file is typically located at "config/database.yml" relative to the application folder. In this case, the file is named "database.yml.example", so we need to make sure it is renamed accordingly before we proceed. Via SSH, we move the file and open it to make our adjustments like so:
$ cd ~/rubyapps/redmine/config/
$ mv database.yml.example database.yml
$ nano database.yml
In this file we are going to see a number of entries, for this tutorial we will only be using the entries directly below the "production:" line. We now edit these lines to match MySQL details entered previously, in this case it looks like so:
production:
  adapter: mysql
  database: aries_redmine
  host: localhost
  username: aries_rubyusr
  password: ourpassword
  encoding: utf8
Now we need to generate a session store secret, this is used by Ruby to manage cookies for the application. This can be done via shell:
$ cd ~/rubyapps/redmine/
$ rake generate_session_store
The database must also be configured via shell, note the last command will ask the language to be configured with the Redmine installation, there are many languages available, in this case we have chosen "en" for English.
$ cd ~/rubyapps/redmine/
$ RAILS_ENV=production rake db:migrate
$ RAILS_ENV=production rake redmine:load_default_data
LiteSpeed Configuration:
Next, we are going to setup LiteSpeed to recognize the Redmine folder as a Ruby application folder. With LiteSpeed, this is a bit different than the usual Ruby on Rails configuration. For LiteSpeed to recognize there is a Ruby on Rails application on your account, we need to create a new file called ".ls_rails_config" in our home directory.
$ nano ~/.ls_rails_config
This file is going to tell LiteSpeed details about our Rails application, for now we will populate it like so:
#RailsApp <name> <App Path> <Rails Env> <Children Processes> <RunOnStart>
RailsApp redmine "/rubyapps/redmine" "production" 4 1

#RailsAppMap <name> <domain> <URI>
RailsAppMap redmine "redmine.ourdomain.com" "/"
RailsAppMap redmine "www.redmine.ourdomain.com" "/"
Now we are able to access Redmine at redmine.ourdomain.com! If you are following along, click the "Sign In" button in the top right corner, and use username "admin" password "admin" to login, and make sure to change your password to something more secure as soon as possible.
Reconfiguring The Application:
If any configuration changes need to be made, for example modifying the email.yml file to add email capabilities to the Redmine application, first make the desired adjustments, then run the following command via SSH to restart your Ruby application:
$ touch ~/.ls_rails_config
Notes For Other Rails Applications:
This tutorial shows a typical Redmine installation under the Ruby on Rails LiteSpeed configuration with our hosting services. If you want to install an application other than Redmine, the steps are exactly the same, just make sure to follow along your application installation guide after creating the database & subdomain, and use the ".ls_rails_config" file instead of any mongrel-rails or WEBrick configuration. Also note, it is also typically unnecessary to adjust folder write permissions with our hosting services, as the Ruby application will run under the account username, the application will have write access to necessary folders even at the default CHMOD 755 setting.